Send temperature & humidity data with ESP32
This guide shows the shortest practical path for sending ESP32 sensor data to Miniviz and visualizing it. It is a good fit for prototypes, demos, and first-time IoT dashboards when you want simple HTTP-based setup instead of a heavier IoT platform.
What We'll Do
Send data using a temperature and humidity sensor and create graphs.
Required Items
- ESP32
- USB cable (for data transfer)
- Temperature and humidity sensor (DHT11, etc.)
- Jumper wires
- Breadboard (optional)
Steps
- Set up ESP32 development environment (PlatformIO)
- Connect/read temperature and humidity sensor
- Run data transmission sample
- Verify data transmission and create graphs
- (Bonus) Configure OTA updates
1. Set Up ESP32 Development Environment (PlatformIO)
Set up ESP32 development environment using PlatformIO.
Install PlatformIO
- Download and install PlatformIO IDE
- Installing as a Visual Studio Code extension is recommended
- Launch Visual Studio Code and verify that PlatformIO extension is enabled
Create Project
- Select "New Project" from PlatformIO home screen
- Enter project name (e.g.,
esp32-miniviz) - Select "ESP32 Dev Module" as Board
- Framework as "Arduino"
- Create project
Set the baud rate to 115200 to avoid garbled text in the serial monitor.
Example platformio.ini file
[env:esp32doit-devkit-v1]
platform = espressif32
board = esp32doit-devkit-v1
framework = arduino
lib_deps = adafruit/DHT sensor library@^1.4.6
monitor_speed = 115200
Add Required Libraries
Add required libraries to the project's platformio.ini file.
2. Connect/Read Temperature and Humidity Sensor
Sensor Connection
Connect a temperature and humidity sensor such as DHT11 to ESP32.
DHT11 Connection Example:
DHT11              ESP32
------             ----------------
(1) VCC  --------> 3.3V
(2) DATA --------> GPIO4
(3) NC   --------> -
(4) GND  --------> GND
3. Run Data Transmission Sample
Create ESP32 code to send data to Miniviz API.
Create Code
Write the following content in src/main.cpp file (replace PROJECT_ID and TOKEN with actual values):
Build and Upload
- Connect ESP32 to PC with USB cable
- Run the following command from PlatformIO terminal:
- Check operation with serial monitor:
Sample Code
This is the full version of the code used in this guide.
- C++ (Arduino)
#include <Arduino.h>
#include <DHT.h>
#include <WiFi.h>
#include <HTTPClient.h>

//----------------------------------------
// Configuration
//----------------------------------------
const int PIN_DHT = 4;
DHT dht(PIN_DHT, DHT11);

const char *ssid = "WIFI_SSID";
const char *password = "WIFI_PASSWORD";

// Miniviz API
const char *project_id = "MINIVIZ_PROJECT_ID";
const char *token = "MINIVIZ_API_TOKEN";

String endpoint = String("https://api.miniviz.net/api/project/") +
                  project_id;

// Deep Sleep (90 seconds)
const uint64_t SLEEP_INTERVAL_US = 90ULL * 1000000ULL;


//----------------------------------------
// Wi-Fi Connection
//----------------------------------------
void connectWiFi()
{
  Serial.println("Connecting to Wi-Fi...");
  WiFi.mode(WIFI_STA);
  WiFi.begin(ssid, password);

  int retry = 0;
  while (WiFi.status() != WL_CONNECTED && retry < 30) {
    delay(300);
    Serial.print(".");
    retry++;
  }
  Serial.println();

  if (WiFi.status() == WL_CONNECTED) {
    Serial.println("Wi-Fi connected");
  } else {
    Serial.println("Wi-Fi connection failed");
  }
}

//----------------------------------------
// NTP Time Synchronization
//----------------------------------------
void syncTime()
{
  Serial.println("Syncing NTP...");
  configTime(0, 0, "ntp.nict.jp", "time.google.com");

  struct tm timeinfo;
  while (!getLocalTime(&timeinfo)) {
    delay(200);
    Serial.print("*");
  }
  Serial.println("\nTime synced");
}

//----------------------------------------
// UNIX Timestamp in Milliseconds
//----------------------------------------
uint64_t getTimestampMs()
{
  struct timeval tv;
  gettimeofday(&tv, NULL);
  return (uint64_t)tv.tv_sec * 1000ULL + (tv.tv_usec / 1000ULL);
}

//----------------------------------------
// POST to Miniviz
//----------------------------------------
void sendToMiniviz(float temp, float humid)
{
  if (WiFi.status() != WL_CONNECTED)
    connectWiFi();

  HTTPClient http;
  http.begin(endpoint);
  http.addHeader("Content-Type", "application/json");
  http.addHeader("Authorization", String("Bearer ") + token);

  uint64_t ts = getTimestampMs();

  String body = "{";
  body += "\"timestamp\":" + String(ts) + ",";
  body += "\"label_key\":\"esp32_home\",";
  body += "\"payload\":{";
  body += "\"temperature\":" + String(temp) + ",";
  body += "\"humidity\":" + String(humid);
  body += "}}";

  int code = http.POST(body);
  Serial.println("HTTP code: " + String(code));
  Serial.println(http.getString());
  http.end();
}

//----------------------------------------
// Setup
//----------------------------------------
void setup()
{
  Serial.begin(115200);
  delay(200);

  dht.begin();
  connectWiFi();
  syncTime();
}

//----------------------------------------
// Loop (exits after one iteration due to DeepSleep)
//----------------------------------------
void loop()
{
  float t = dht.readTemperature();
  float h = dht.readHumidity();

  Serial.printf("Temperature: %.2f°C  Humidity: %.2f%%\n", t, h);

  sendToMiniviz(t, h);

  Serial.println("Entering deep sleep...");
  esp_deep_sleep(SLEEP_INTERVAL_US);
}
4. Verify Data Transmission and Create Graphs
Verify Data Transmission
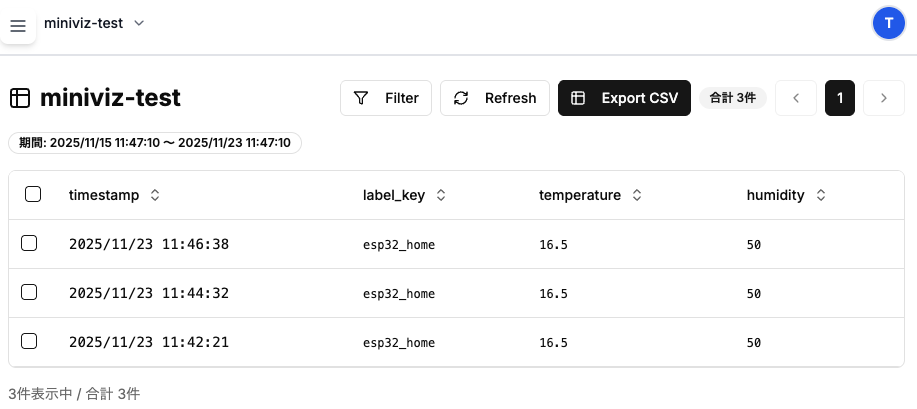
- Log in to Miniviz web interface
- Check sent data from Database menu
- Verify that temperature and humidity data is displayed
Create Graphs
- Create graphs from Visualize menu
- Select graph type (line chart recommended)
- Select temperature and humidity as data sources
- Verify that graphs are displayed correctly
For details, see "5. Create Charts" in Quick Start.
Common errors
Why is my ESP32 data not showing up in Miniviz?
Check these points first:
- The ESP32 is connected to Wi-Fi successfully
PROJECT_IDandTOKENare copied correctly- The request body includes
timestamp,label_key, andpayload payloadvalues are only strings or numbers
Why do I get a 403 error from the API?
The usual causes are:
- The token is invalid or belongs to another project
- The request URL or endpoint is incorrect
- You are trying to use a feature that is not included in your plan
Which payload types should I avoid?
Do not send these payload value types:
- Nested objects
- Arrays
- Boolean values
null